I added Google’s new +1 button to this blog with relative ease, but then found out it didn’t work! I must admit I was a bit lazy and didn’t follow the instructions to the letter, but it appeared to be working with the button added to the bottom of each post on the main page and on a single post’s page. Then someone pointed out they were getting an error, oops!
Since I made a mess of adding the +1 button I thought I should share what I did incorrectly and the correct way to get it working with WordPress using the default “Twenty Ten” theme.
What is Google’s +1 Button?
The Google +1 button for websites was only launched at the start of June, 2011. It is still early days and therefore difficult to determine the full implications of the +1 button, so I’ll just give the basic information here, rather than predicting what the future holds.
The idea of the +1 button is similar to Facebook’s like button, which I have also added to this site. That is, you can show your friends and contacts which things you find interesting on the web such as a web page, a video, a search result or even an ad. Google’s +1 button also integrates with Google’s services, enabling you to see +1 information in both the search results and on advertisements. There is also integration with non-Google sites to help customize content and ads.
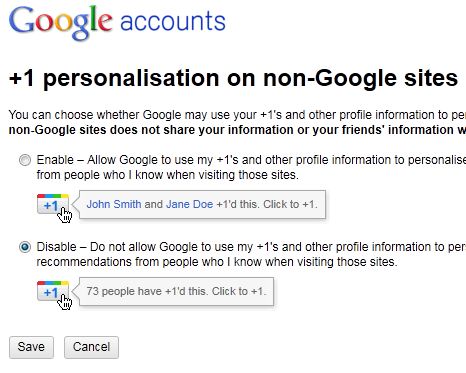
None of this will work without your own Google account and if you want the non-Google site integration you have to change a preference setting in your account information. If you already have a Google account you can go to your account preferences where you should see an option to edit “+1 on non-Google sites” under the “Personal Settings” section. Once you click the edit link it will take you this screen:
 Notice that it is set to “Disable” by default (a sensible policy!), so you need to “Enable” it to get the full integration with non-Google sites. I’m not quite sure what they mean by “personalise content” other than showing which friends actually clicked on the +1 button instead of just the numbers of people who have clicked on it (as shown in the image above). In any case I have enabled the option to see what happens.
If you want your contacts to be able to see which +1 buttons you have clicked on you need to make some adjustments to your Google profile too. You should see a “+1” tab on your profile page where you can set the preference to keep it private or to make it public. Here is mine:
 You can see that my preference is set to private (“This tab is only visible to you.”). You can change this preference by editing your profile which will show you the following screen:
 I haven’t changed this preference yet. I didn’t even know I had a Google profile before I started reading about Google’s +1 button! 🙂
Here are some handy links if you want to know more: Google’s +1 Page, Google’s Profile Information Page.
How to get the Code?
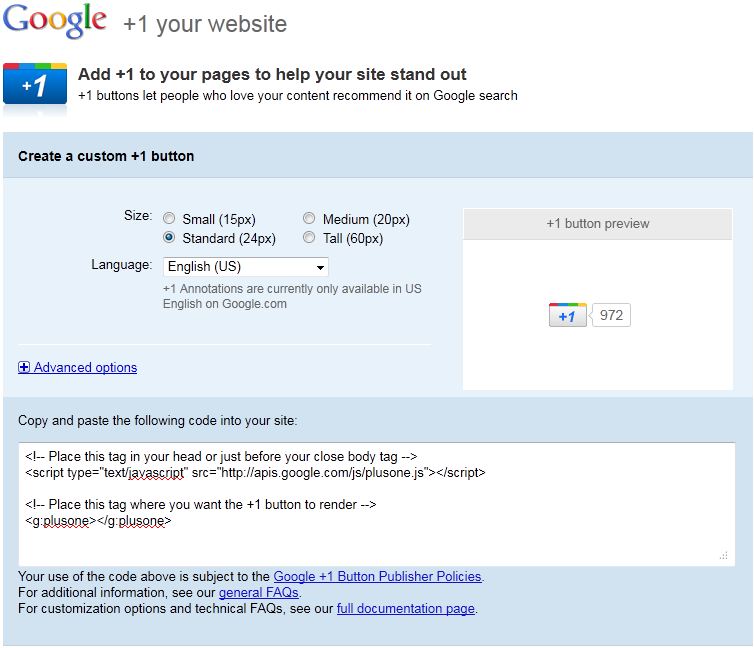
I actually had some information appear on my Google Adsense dashboard about the Google +1 button which took me to the correct page to get the relevant code. You can also go directly to the main configuration page which allows you to change a few options before getting the final code.
 As you can see above there are two main cope snippets that you need to use. The first is the Javascript code reference and the second is the code to make the button appear.
How NOT to Add the Google +1 Button to WordPress!
I was lazy and thought well I wonder what happens if you just copy and paste the code into the loop.php and loop-single.php, even though it says to put the script tag in the <head> section or just before the </body> tag. Well it worked, or so I thought. The button appeared in the correct place and I was quite chuffed with my efforts, so I went and added the Facebook like button too. I didn’t test the button because I thought it would be a bit lame to click on my own website. In hindsight I probably should have!
I was talking to my stepfather this morning and showed him what I had done, as he has a couple of blogs that he is working on too. He was curious and decided to click on the Google +1 button which ended up with the +1 button turning red in anger with an “!” in the middle of it. I tried it too and then faced the same problem.
Time to RTFM!
How to Add the Google +1 Button to WordPress!
Funnily enough, if you actually follow the instructions that Google provides then not only will the +1 button appear on your blog, it will actually work too! 😉
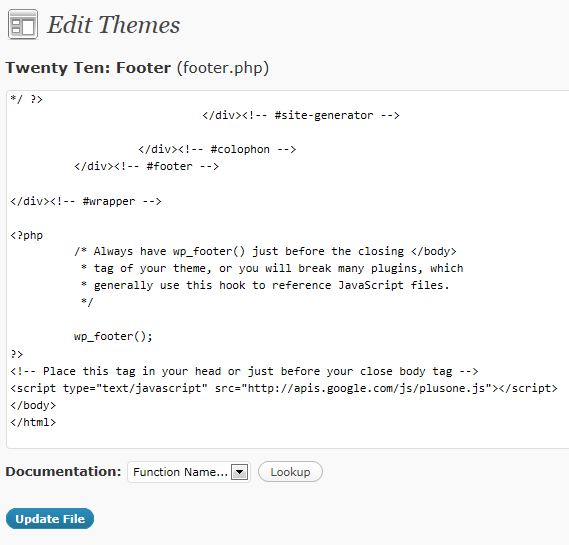
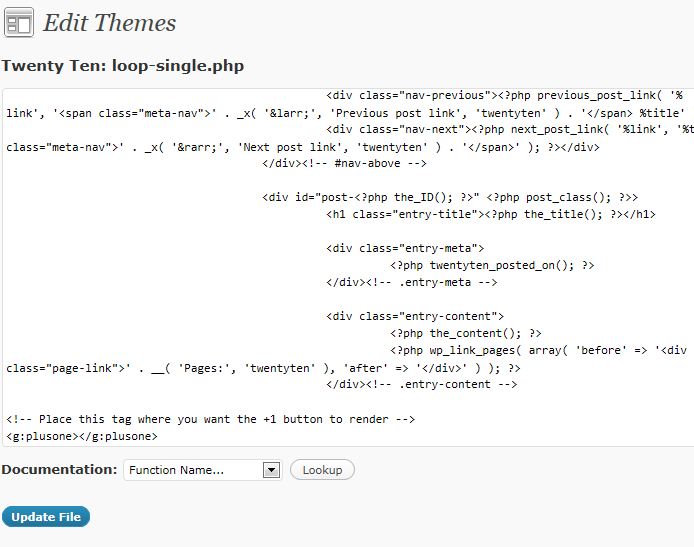
I put the script tag just before the </body> tag by editing the footer.php file. Depending on where you want the +1 button to appear you can then edit the other files as appropriate. For example, if you just want to have the +1 button appear on your single post pages then you only need to edit the loop-single.php file.
I decided to put it on both my main page, after every post, and on a single post page. This meant I had to edit both the loop-single.php file and the loop.php file.
To edit the “Twenty Ten” theme you need to log into your dashboard screen, click on Appearance and then select Editor. This will normally bring you to the stylesheet file by default. The other files you need to edit are listed on the right hand side.
First off, select the footer.php link and put the first code snippet just before the </body> tag, like this:
Now select the loop-single.php link and insert the second code snippet like this:
It’s the same for anywhere else you would like to put it, so just edit the relevant file and insert the code where you want the button to appear. You could also put the code in a widget if you so desired.
Conclusion
Google is introducing more social networking features to try and keep up with Facebook. The +1 button looks like it might be a useful tool for both web users and webmasters, but time will tell.
There are probably better ways of adding the Google +1 button to WordPress with the Twenty Ten theme, such as using custom functions, but this works for what I needed and I hope you find it useful too!


