Linux Mint – Unable to Install GRUB – Fatal Error

My main home computer has been running Linux Mint since release 12 (2012) with upgrades to various releases over the years. For the past year I have been using Linux Mint 18.3. I skipped Linux Mint 19 to allow for some stability on the new base and therefore decided to upgrade to Linux Mint 19.1 once it was released on December 19, 2018.

The main problem that I encountered during the installation of Linux Mint 19.1 was the fatal error “Unable to Install GRUB”. Without GRUB installed the computer can’t boot the Linux kernel, so it was a major installation problem!

If you prefer, I’ve recorded a video of my experience with Linux Mint 19.1, including my hardware, how I use my computer on a daily basis, the installation process, problems I found and some of the good things too. Otherwise, read on!

After clicking OK on the error message another window popped up with the option to install GRUB on any of the available drives. The Linux Mint 19.1 installer tried to install GRUB on one of my RAID drives (/dev/sda) instead of the brand new Samsung SSD (/dev/sdb). I tried the /dev/sdb option, but that failed too. At this point I took the photo that is the thumbnail for the above video.

Some of the suggestions online mentioned changing the boot order of the drives in the BIOS, but that didn’t work for me. It seems that /dev/sda will always be determined from the physical SATA port rather than the BIOS boot order.

The Linux Mint Disks utility shows my drives and how the Samsung 860 EVO 1TB SSD drive is always presented as the second drive (/dev/sdb).
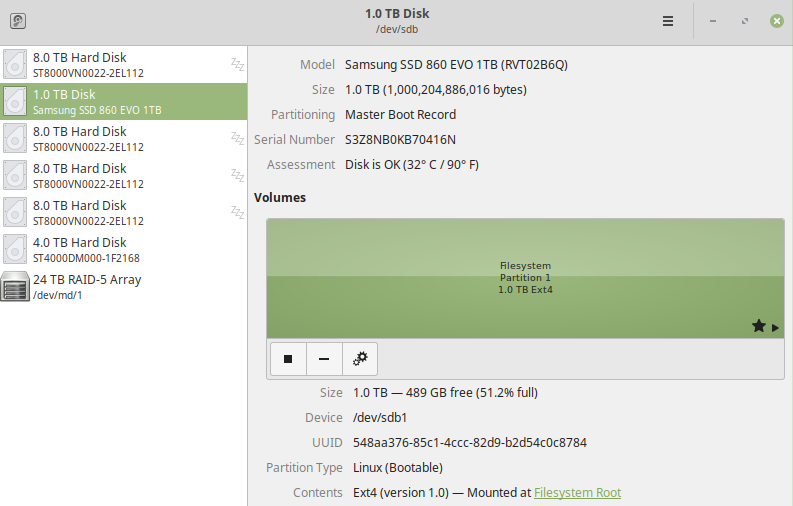
Linux Mint Drives

Linux Mint Drives


Another suggestion said to disconnect all the other drives when performing the installation, so I tried that and it worked! There were no problems after reconnecting the other drives and starting Linux Mint 19.1 again. The operating system has been running for for almost 48 hours now with just a few niggles here and there that I describe in more detail in my YouTube video.

Let me know if this helped to solve your “Unable to install GRUB” problem in the comments below.

Brother Scanner not Found on Linux Mint 18.1 and Ubuntu 16.04 – Fixed!

I’ve previously posted about my Brother MFC-7840N printing slowly, but since then Brother updated their driver package for Linux and everything was going quite smoothly. Unfortunately, after I upgraded from Linux Mint 17.3 to Linux Mint 18.1 today, the Brother Linux drivers failed to activate the scanner. When I started XSane it said there was no scanner found.

After a lot of re-installing of drivers and scanner configurations I found the problem was simply some missing files. It seems sane must be looking for information in the standard directories and not where the 64-bit libraries are.

Anyway, here are the commands to run to make your Brother scanner work with Linux Mint and Ubuntu.

sudo mkdir /usr/lib/sane
sudo ln -s /usr/lib64/sane/libsane-brother3.so /usr/lib/sane/libsane-brother3.so
sudo ln -s /usr/lib64/sane/libsane-brother3.so.1 /usr/lib/sane/libsane-brother3.so.1
sudo ln -s /usr/lib64/sane/libsane-brother3.so.1.0.7 /usr/lib/sane/libsane-brother3.so.1.0.7
sudo ln -s /usr/lib64/libbrscandec3.so /usr/lib/libbrscandec3.so
sudo ln -s /usr/lib64/libbrscandec3.so.1 /usr/lib/libbrscandec3.so.1
sudo ln -s /usr/lib64/libbrscandec3.so.1.0.0 /usr/lib/libbrscandec3.so.1.0.0

If you are already logged in as root (naughty you!) then just use the same commands without sudo.

mkdir /usr/lib/sane
ln -s /usr/lib64/sane/libsane-brother3.so /usr/lib/sane/libsane-brother3.so
ln -s /usr/lib64/sane/libsane-brother3.so.1 /usr/lib/sane/libsane-brother3.so.1
ln -s /usr/lib64/sane/libsane-brother3.so.1.0.7 /usr/lib/sane/libsane-brother3.so.1.0.7
ln -s /usr/lib64/libbrscandec3.so /usr/lib/libbrscandec3.so
ln -s /usr/lib64/libbrscandec3.so.1 /usr/lib/libbrscandec3.so.1
ln -s /usr/lib64/libbrscandec3.so.1.0.0 /usr/lib/libbrscandec3.so.1.0.0

Hopefully this post saves some time for a few people and will remind me what to do when I hit the same problem with my Brother MFC-7840N scanner not being found!

Installing Kdenlive 0.9.10 on Linux Mint 17.1 (Rebecca)

In this post I’ll describe how to install Kdenlive 0.9.10 (or any later version) on Linux Mint 17.1 using the Kdenlive repositories.

When installing the default Kdenlive version from the standard Linux Mint 17.1 repositories I found the version was out of date at 0.9.8 instead of the current 0.9.10. I thought it would just be a matter of adding the required Kdenlive repositories to my software sources and the next update cycle would upgrade Kdenlive, but the default process didn’t work.

The problem is with the priority of the software sources. The Linux Mint repository is listed with a higher priority than the newly added Kdenlive repository. Thus, try as you might, Kdenlive 0.9.8 will always be preferred over newer versions in the Kdenlive repository. You can verify the priorities by running the following command:

apt-cache policy kdenlive

In the output you should see the Candidate version as 0.9.8 and see the priority of the Kdenlive repository listed as 500, while the priority of the default Linux Mint repository is listed at 700. Once you have fixed the priority and installed Kdenlive 0.9.10 the output of the command should look something like this:

kdenlive:
 Installed: 0.9.10-0ubuntu0~sunab~trusty1
 Candidate: 0.9.10-0ubuntu0~sunab~trusty1
 Version table:
 *** 0.9.10-0ubuntu0~sunab~trusty1 0
 800 http://ppa.launchpad.net/sunab/kdenlive-release/ubuntu/ trusty/main amd64 Packages
 100 /var/lib/dpkg/status
 0.9.8-1ubuntu2~ubuntu14.04~ppa1 0
 700 http://packages.linuxmint.com/ rebecca/import amd64 Packages
 0.9.6-5ubuntu1 0
 500 http://mirror.oscc.org.my/ubuntu/ trusty/universe amd64 Packages

To fix the priorities you need to add the relevant information into either official-extra-repositories.pref or official-package-repositories.pref located in the /etc/apt/preferences.d directory. Open your favourite editor and add the following lines (I used official-extra-repositories.pref):

Package: *
Pin: release o=LP-PPA-sunab-kdenlive-release
Pin-Priority: 800

To update the changes you then need to run:

apt-get update

Now that you have overridden the default repository you will be able to install or upgrade Kdenlive to the latest version from the Kdenlive repository by using either:

apt-get install kdenlive
apt-get upgrade kdenlive

Compared to Kdenlive 0.9.8 on Linux Mint 17.1 the latest version 0.9.10 is a massive improvement. When I started 0.9.8 it kept on crashing during the start-up wizard and even if I made it past that point I couldn’t even add a clip to the project without a crash. As soon as I upgraded to 0.9.10 I was able to quickly get a video together and had no bugs during the simple editing process.

Hopefully the Linux Mint and Kdenlive teams will sort out the software sources priority problem and enable us to get the latest Kdenlive version installed without the above manual steps.